File upload widget in Jupyter Notebook web app
 Wouldn't it be fantastic if you could share a Jupyter Notebook with your coworkers and allow them to upload a new file that is processed by your notebook? I will show you how to add a file upload widget to your Jupyter Notebook and share it as a web app with Mercury framework.
Create a notebook
I assume that you have a GitHub repository set, created a virtual environment, and installed Mercury. You can read how to do this in our article: Share Jupyter Notebook as web app
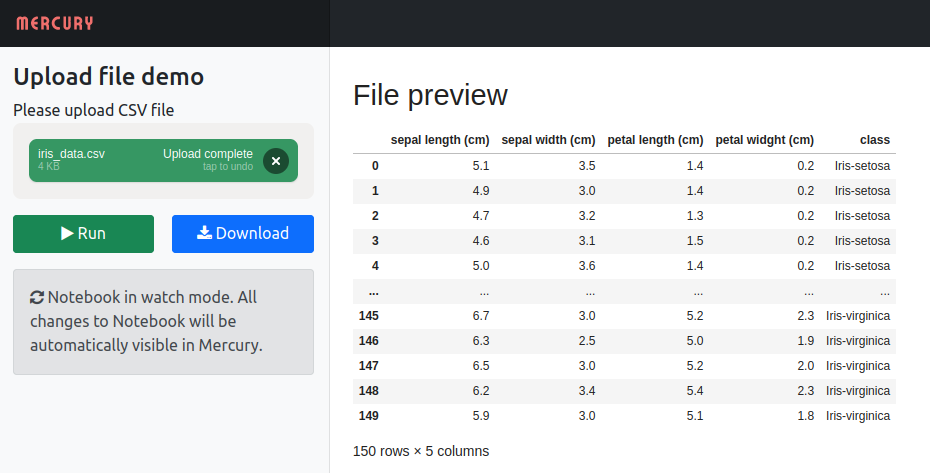
Our notebook will read the uploaded data file and display a Pandas data frame. Please remember to add the pandas package in the requirements.txt file.
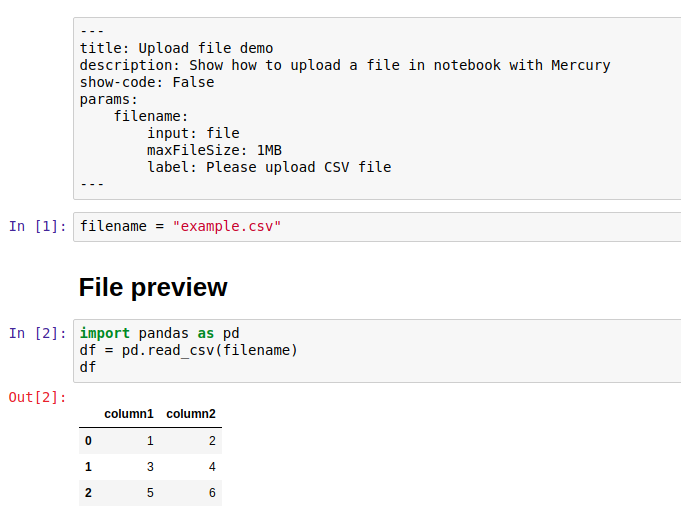
The first RAW cell has the YAML configuration of the application.
---
title: Upload file demo
description: Show how to upload a file in notebook with Mercury
show-code: False
params:
    filename:
        input: file
        maxFileSize: 1MB
        label: Please upload CSV file
---
In the params, there is a defined filename variable and file upload widget. The same variable should be defined in the cell below.
filename = "example.csv"
In the code, I set some example.csv files. I put this file here to make the code executable. You can check the file in my repository:
In the next cells, there is a Markdown header and the code to read csv file and display the DataFrame.
You can check what the application looks like by running the watch command:
mercury watch file_upload.ipynb
You should see:
Deploy the app to Heroku
I've deployed the app to the Heroku free dyno. Below are commands that I've used:
heroku create mercury-demo-2
heroku config:set SERVE_STATIC=True
heroku config:set NOTEBOOKS=*.ipynb
heroku config:set ALLOWED_HOSTS=mercury-demo-2.herokuapp.com
Please remember to change mercury-demo-2 with your application name. Then I've added a Procfile to the project:
web: mercury runserver 0.0.0.0:$PORT --runworker
The Procfile should be added to the GitHub repo. The final step to deploy the app is:
git push heroku main
That's all! :) You should be able to go to the web browser at the address: http://mercury-demo-2.herokuapp.com
Summary
The Mercury is a perfect tool to share your Python Notebook with non-coders. You can easily add interactive widgets to Jupyter Notebook. No need to rewrite your code into any web framework.
We offer Mercury Pro for companies looking for a commercial-friendly license, more features, and dedicated support. Check our pricing website for details.
The Mercury GitHub repository: https://github.com/mljar/mercury
Would like to receive updates from us?
Subscribe to our newsletter
AI Data Analyst on Your Computer
Use MLJAR Studio to explore data, find insights, and create reports with AI. Everything runs locally, so your data stays with you.
About the Author

Related Articles
- MLJAR Studio a new way to build data apps
- Read Google Sheets in Python with no-code MLJAR Studio
- How to authenticate Python to access Google Sheets with Service Account JSON credentials
- Python Virtual Environment Explained
- Share Jupyter Notebook as web app
- Build Computer Vision Web App with Python, OpenCV and Mercury
- Develop NLP Web App from Python Notebook
- The 2 alternative approaches for Jupyter Notebook widgets
- The ipynb Jupyter Notebook File Extension
- How to create Mercury private fork and customize?