How to create Invoice Generator in Python
Running a business is quite a difficult thing. You have many responsibilities that take a lot of time. One of them is giving invoices, which could cause a lot of problems... But don't worry, we created an Invoice Generator, which will help you with it. In this article, you can find an explanation of how it was created and how does it work.
Enjoy reading :)
Create an Invoice Generator
Required packages
List of packages
mercuryis a package for turning notebooks into web apps.reportlaballows to create and edit a PDF.osallows you to do basic system operations.dateis for date and time operations.
Make sure that you have installed them before you start doing anything.
Import packages
Now, when you have installed all the needed packages, it's time to import them:
import mercury as mr
from reportlab.pdfgen import canvas
from reportlab.lib.utils import ImageReader
import os
from datetime import date
Create a PDF
First of all, you have to create a PDF where an invoice will be created. Use Text widget from Mercury to ask for the name of the file:
file_name = mr.Text(
    value="invoice",
    label="Enter PDF name:",
    rows=1
)
It's a good practice to set the default value of every input widget.
As you remember, we want the invoice to be PDF, so create a condition that checks if there is ".pdf" at the end of the file and, if not, adds it.
if file_name.value.endswith(".pdf"):
    fname = f"{file_name.value}"
else:
    fname = f"{file_name.value}.pdf"
Then, create the last conditional statement to check if a file with the same name exists and, if it does, delete that file.
if os.path.exists(fname):
    os.remove(fname)
After that, you can create a PDF using the following code:
pdf_file = canvas.Canvas(fname)
The first step is done! You have created a PDF using Python. Now, let's add some content to it.
Get information
Now, you have to get all the necessary information from the user; you can do it using Mercury widgets. Let's introduce division into sections to create a nice edit panel and keep order:
- File details
- Invoice details
- Seller details
- Buyer details
- Product details
At the top of every section, write the following code:
mr.Note(
    text="## xxxxxx details:"
)
And as a text value write the name of the section, it will make the edit panel better :)
File details
Place here query for the file name that you wrote earlier and ask for the title of the PDF by typing this code:
pdf_title = mr.Text(
    value="Invoice Generator",
    label="Enter PDF title",
    rows=1
)
Invoice details
Ask for invoice number:
invoice_number = mr.Text(
    value="01234",
    label="Enter Invoice Number:",
    rows=1
)
And for the logo of the company:
uploaded_image = mr.File(
    label="Upload logo:"
)
Then, create a function that allows to scale of uploaded pictures:
def scale_image(image, max_width, max_height):
    width, height = image.getSize()
    aspect_ratio = width / height

    if width > max_width:
        width = max_width
        height = width / aspect_ratio

    if height > max_height:
        height = max_height
        width = height * aspect_ratio

    return width, height
Now, create a conditional statement that checks if the file is a PNG or JPG format and if it is set as a logo:
if uploaded_image.value is not None:
    if uploaded_image.filename.endswith("png") or uploaded_image.filename.endswith("jpg"):
        logo = ImageReader(uploaded_image.filepath)
        scaled_width, scaled_height = scale_image(logo, 200, 100)
    else:
        print("The logo have to be .png or .jpg")
Seller details
In this section, ask for the seller's name, address, NIP, bank name, and bank account.
seller_name = mr.Text(
    value="Seller Company Name",
    label="Enter seller's company name:",
    rows=1
)
seller_address = mr.Text(
    value="9153 Jerry Dr, Juneau, Alaska 99801, USA",
     label="Enter seller's company address:",
      rows=1
)
seller_nip = mr.Text(
    value="0123456789",
    label="Enter seller's company NIP:",
    rows=1
)
seller_bank_name = mr.Text(
    value="Example Bank Name",
    label="Enter seller's bank name",
    rows=1
)
seller_bank_account = mr.Text(
    value="0123456789",
    label="Enter seller's bank account",
    rows=1
)
Buyer details
It's similar to Seller details, but don't ask for bank name and account here.
buyer_name = mr.Text(
    value="Buyer Company Name",
    label="Enter buyer's company name:",
    rows=1
)
buyer_address = mr.Text(
    value="1518 Stellar Dr, Kenai, Alaska 99611, USA",
    label="Enter buyer's company address:",
    rows=1
)
buyer_nip = mr.Text(
    value="9876543210",
    label="Enter buyer's company NIP:",
    rows=1
)
Product details
First, ask for the amount of products. The range is from 1 to 15, but you can change it.
products_amount = mr.Slider(
    value=3,
    min=1,
    max=15,
    label="Amount of products:",
    step=1
)
Now, create the loop to ask for information about every product:
products_names = []
products_quantity = []
products_price = []

for i in range(0, products_amount.value):
    products_names += [
        mr.Text(
            label=f"Product nr {i+1} name:",
            value=f"example product {i+1}",
            url_key=f"n-{i}",
        )
    ]
    products_quantity += [
        mr.Numeric(
            label=f"Product nr {i+1} quantity:",
            value=i + 1,
            min=1,
            max=1000,
            step=1,
            url_key=f"q-{i}",
        )
    ]
    products_price += [
        mr.Numeric(
            label=f"Product nr {i+1} price:",
            value=i + 0.99,
            min=0.01,
            max=1000000,
            step=0.01,
            url_key=f"p-{i}",
        )
    ]
Remember to set default values!
Lastly, create a loop that will count every product price and add all of them to get the total price:
total_price = 0
for i in range(0, products_amount.value):
    total_price +=products_price[i].value*products_quantity[i].value
Edit a PDF
Now, the most fun part begins. After you get all of the needed information, put them in a PDF. This is an individual matter so you can do it just like you want. If you need any information, check the Reportlab Docs - a library which we used to create the PDF. But we won't leave you alone with it. Here is a code that we use:
pdf_file.setTitle(f"{pdf_title.value}")
pdf_file.setFont("Helvetica", 50)
pdf_file.drawString(30, 780, "INVOICE")
if uploaded_image.value is not None:
    pdf_file.drawImage(logo, 370, 735, scaled_width, scaled_height, mask="auto")
pdf_file.setFont("Helvetica", 20)
pdf_file.drawString(35, 760, f"Invoice number: {invoice_number.value}")
pdf_file.drawString(35, 700, "Seller:")
pdf_file.drawString(335, 700, "Buyer:")
pdf_file.setFont("Helvetica", 15)
pdf_file.drawString(35, 740, f"Date of issue: {date.today()}")
pdf_file.drawString(90, 600, "Description")
pdf_file.drawString(230, 600, "Quantity")
pdf_file.drawString(350, 600, "Price")
pdf_file.drawString(450, 600, "Total")
pdf_file.line(80, 590, 500, 590)
pdf_file.setFont("Helvetica", 10)
for i in range(0, products_amount.value):
    pdf_file.drawString(90, 570 - 20 * i,
        products_names[i].value
    )
    pdf_file.drawString(245, 570 - 20 * i,
        f"{products_quantity[i].value}"
    )
    pdf_file.drawString(355, 570 - 20 * i,
        f"${products_price[i].value}"
    )
    pdf_file.drawString(455,570 - 20 * i,
        f"${round(products_price[i].value*products_quantity[i].value, 2)}",
    )
pdf_file.drawString(40, 670, f"{seller_name.value}")
pdf_file.drawString(40, 660, f"{seller_address.value}")
pdf_file.drawString(40, 650, f"NIP: {seller_nip.value}")
pdf_file.drawString(340, 670, f"{buyer_name.value}")
pdf_file.drawString(340, 660, f"{buyer_address.value}")
pdf_file.drawString(340, 650, f"NIP: {buyer_nip.value}")
pdf_file.drawString(450, 80, f"${round(total_price,2)}")
pdf_file.drawString(90, 80, f"Bank name: {seller_bank_name.value}")
pdf_file.drawString(90, 60, f"Bank account: {seller_bank_account.value}")
pdf_file.setFont("Helvetica", 15)
pdf_file.drawString(90, 110, "Bank transfer details")
pdf_file.drawString(450, 110, "Total")
pdf_file.line(80, 100, 500, 100)
Save and display PDF
To save the PDF, use this code:
pdf_file.showPage()
pdf_file.save()
You can display it in your Notebook using PDF widget from Mercury.
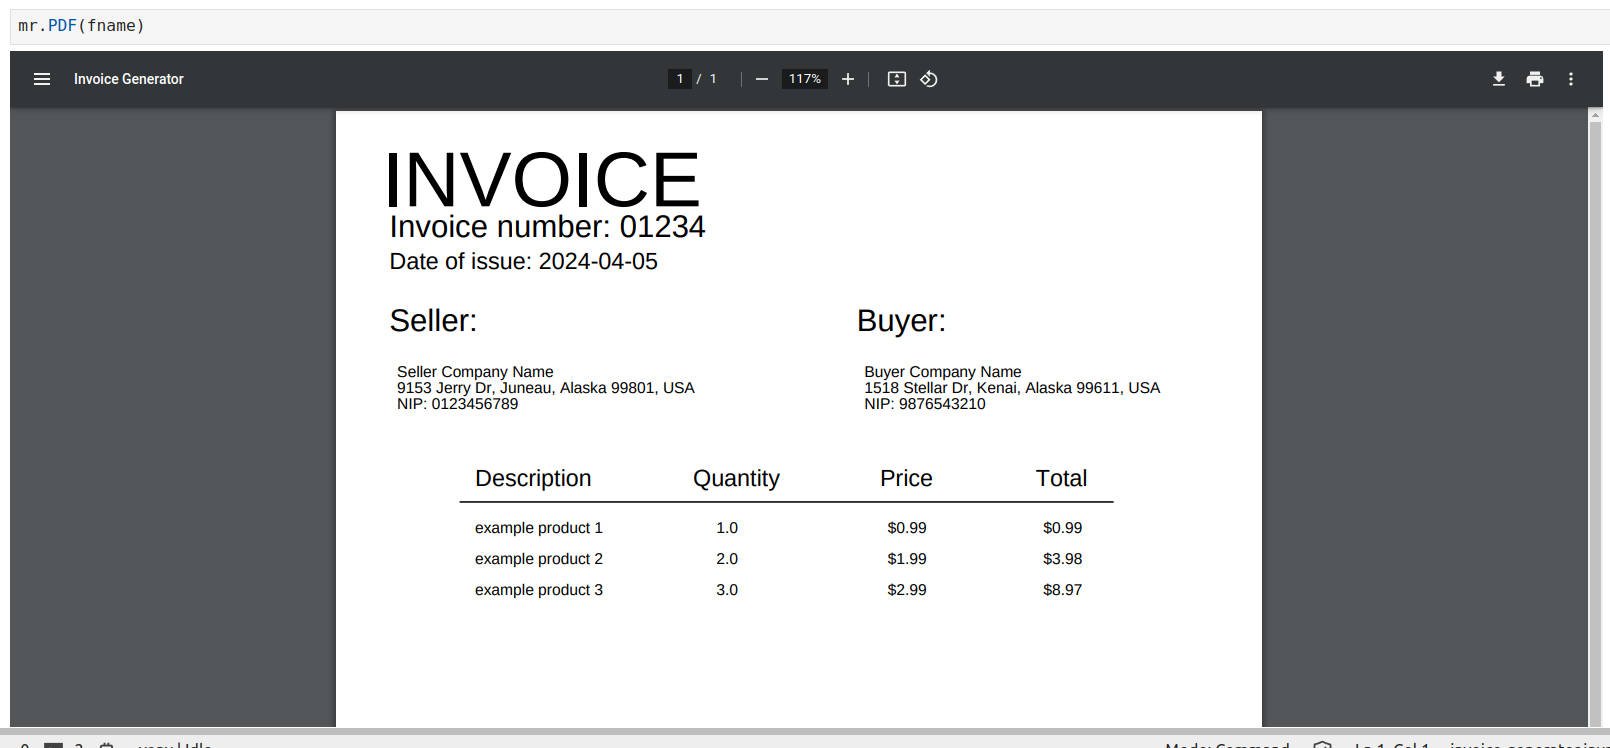
mr.PDF(fname)
It should look like this:
Invoice Generator as a Mercury App
Recently, you created the code for an Invoice Generator. It's not really a generator because other users who don't know Python can't create invoices. But there is a way to let them use this generator—create a Web App using Mercury Cloud.
Create a Web App
Firstly, sign up on Mercury Cloud if you don't have account yet.
After that, create a new site by clicking +Add Site button.

Then, fill in the site information and upload files. You need to upload the notebook with the code and the requirements.txt. If you don't know how to create a requirements.txt file, get more information right here: Install your packages.
After you confirm everything, it should look like this:
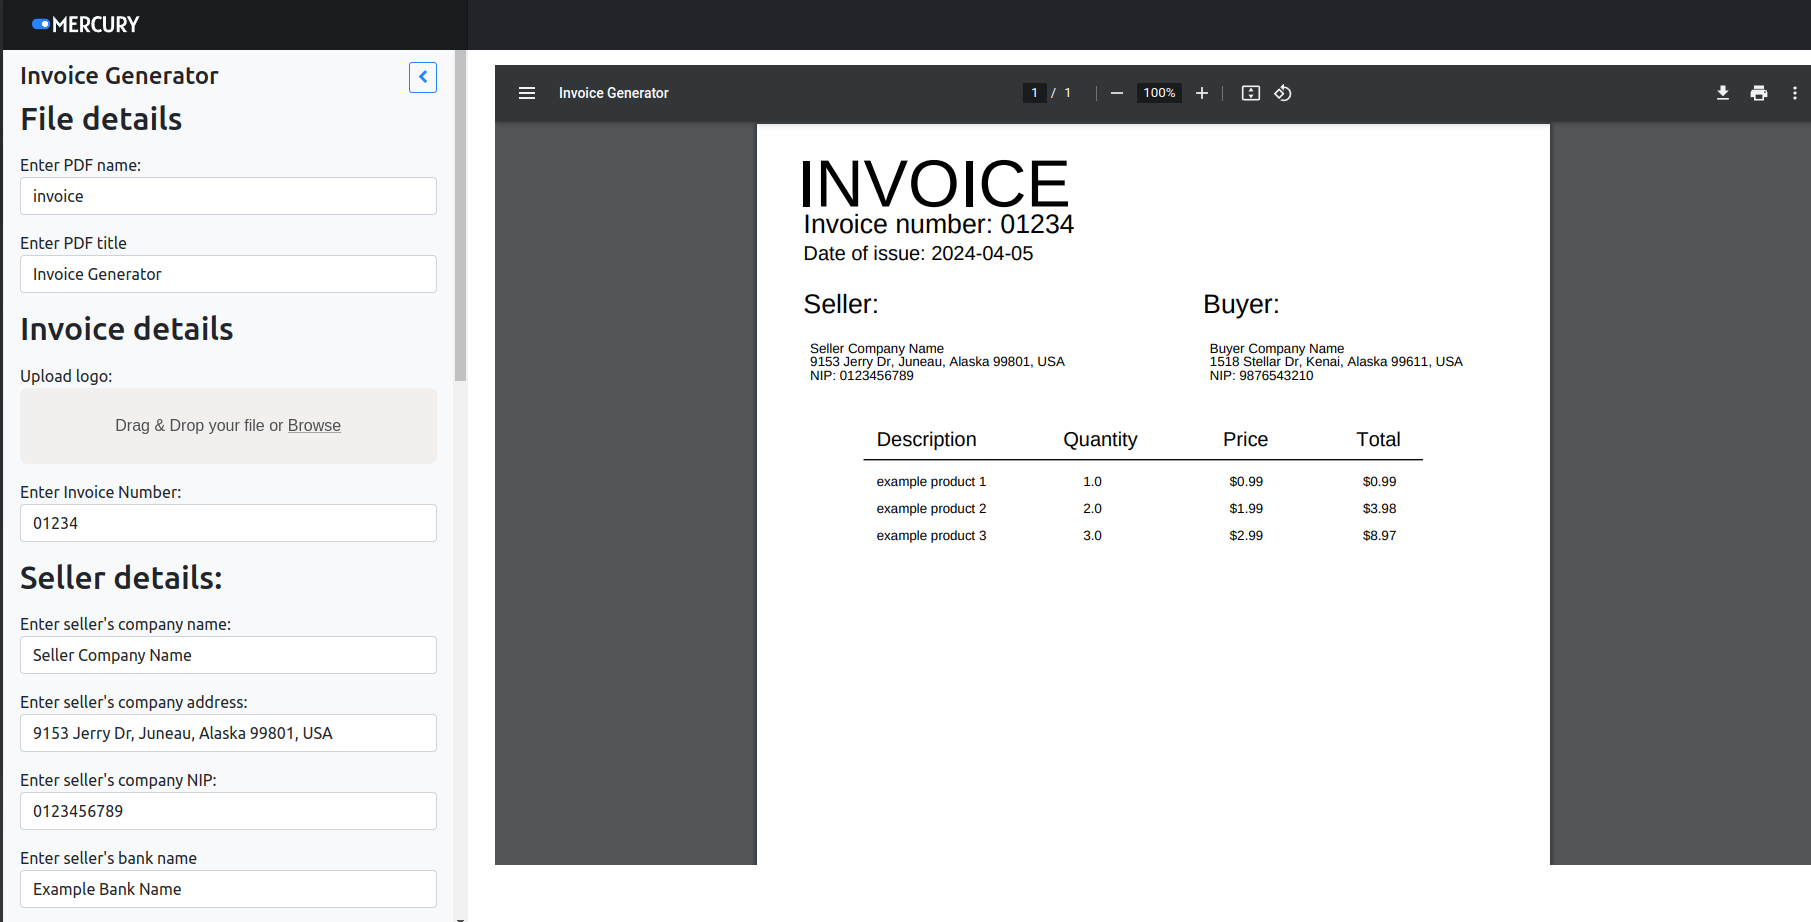
Check our version: https://invoicegenerator.runmercury.com
How does the Invoice Generator work
Our Invoice Generator was created to make giving invoices easier. Moreover, we want to show how people can use widgets from Mercury, which are very helpful in many situations.
How to generate an invoice
- Open the notebook with code locally using Mercury or go to the Invoice Generator Web App.
- Fill all blanks with your data.
- Check if everything is correct and confirm.
Now, when you have generated your invoice, you can download it as a PDF or HTML file.
Summary
After reading this article, you should have sufficient knowledge to create an invoice generator that is deployed as a web application and can be easily shared with non-technical users. Try to create any generator by yourself and share your results or give feedback.
Explore next
Continue with practical guides, tutorials, and product workflows for Python, AutoML, and local AI data analysis.
- AI Data Analyst
Analyze local data with conversational AI support and notebook-based, reproducible Python workflows.
- AutoLab Experiments
Run autonomous ML experiments, track iterations, and inspect results in transparent notebook outputs.
- MLJAR AutoML
Learn how to train, compare, and explain tabular machine learning models with open-source automation.
- Machine learning tutorials
Step-by-step guides for beginners and practitioners working with Python, AutoML, and data workflows.
Run AI for Machine Learning — Fully Local
MLJAR Studio is a private AI Python notebook for data analysis and machine learning. Generate code with AI, run experiments locally, and keep full control over your workflow.
About the Author

Related Articles
- Jupyter Notebook in 4 flavors
- Python Dashboard for 15,963 Data Analyst job listings
- Fairness in Automated Machine Learning
- 3 ways to access credentials in Jupyter Notebook
- How to create Dashboard in Python from PostgreSQL
- ChatGPT can talk with all my Python notebooks
- Create Retrieval-Augmented Generation using OpenAI API
- Transfer data from Postgresql to Google Sheets
- Machine Learning Algorithm Comparison
- TabNet vs XGBoost