How to create a dashboard in Python with Jupyter Notebook?
Would you like to build a data dashboard in 9 lines of Python code? I will show you how to create a dashboard in Python with Jupyter Notebook. The dashboard will present information about stock for selected ticker (data table and chart). The notebook will be published as a web application. I will use an open-source Mercury framework to convert Python notebook to interactive web application.
The demo of the financial dashboard created in Python with Jupyter Notebook and published with Mercury:
The dashboard is available online at dashboard-jupyter-notebook.herokuapp.com/ (free Heroku dyno). The code repository: github.com/pplonski/dashboard-python-jupyter-notebook.
Build dashboard with 9 lines of Python code
Let's start by creating an empty repository and cloning it:
git clone git@github.com:pplonski/dashboard-python-jupyter-notebook.git
Please setup the virtual environment:
virtualenv djenv
source djenv/bin/activate
I choose djenv as a name for virtual environment. I keep all required packages in the requirements.txt file:
mljar-mercury
mplfinance
yfinance
The mljar-mercury is a Python package with Mercury framework. The mplfinance is a package to plot financial data using matplotlib. The yfinance is a package to download market data from Yahoo Finance API. Let's install required packages and set our environment as Jupyter kernel:
pip install -r requirements.txt

# add kernel
python -m ipykernel install --user --name djenv
We have environment ready, the next step is to start a Jupyter Notebook and create a new notebook. Please remember to select kernel with djenv name when creating a new notebook:
# starts Jupyter Notebook
jupyter notebook
The code in notebook
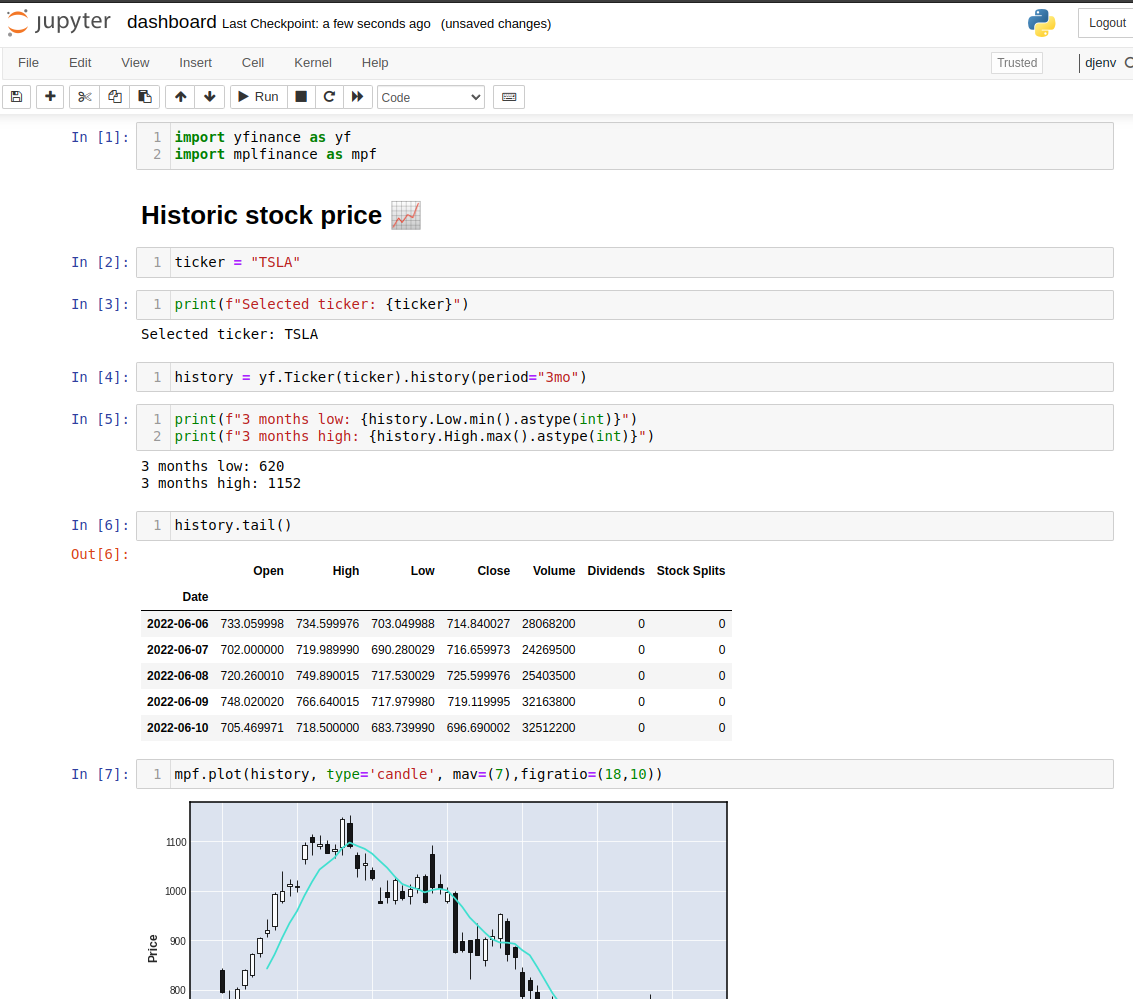
We start the code with imports:
import yfinance as yf
import mplfinance as mpf
The stock data will be displayed for selected ticker. Let's create a variable for that:
ticker = "TSLA"
The market data for selected ticker can be fetched with 1 line of code, thanks to amazing yfinance package:
history = yf.Ticker(ticker).history(period="3mo")
We can print some statistics about data:
print(f"3 months low: {history.Low.min().astype(int)}")
print(f"3 months high: {history.High.max().astype(int)}")
Display the last 5 rows in the data (last 5 trading days):
history.tail()
The history variable is a Pandas DataFrame. The financial data can be easily plotted with mplfinance package:
mpf.plot(history, type='candle', mav=(7),figratio=(18,10))
The candle plot with 7-days moving average (1 line of code):
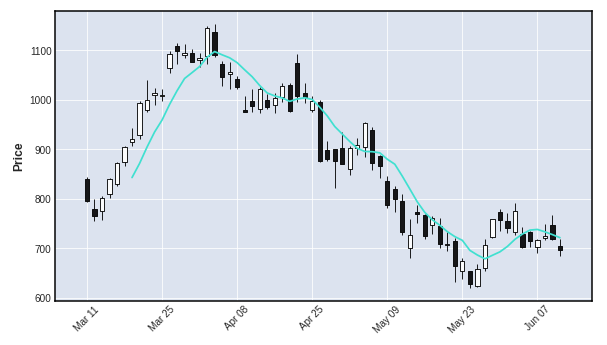
The whole notebook is preseted below, it has only 9 lines of Python code:
Share dashboard with non-technical users
OK, the notebooks is ready. You can change the ticker variable (for example set to "MSFT") and execute the notebook to get new data. However, it is not convenient to share the notebook with code, it is sometime impossible, if your users are non-technical and can't install Python and required packages. Please don't worry! 😊 There is an open-source framework called Mercury for converting Python notebooks into interactive web applications. You can hide the code in the notebook and show only outputs (table and chart). The web app can be deployed to the cloud. You will share the link to the web application. The ticker variable can be converted into interactive widget. Sounds interesting?
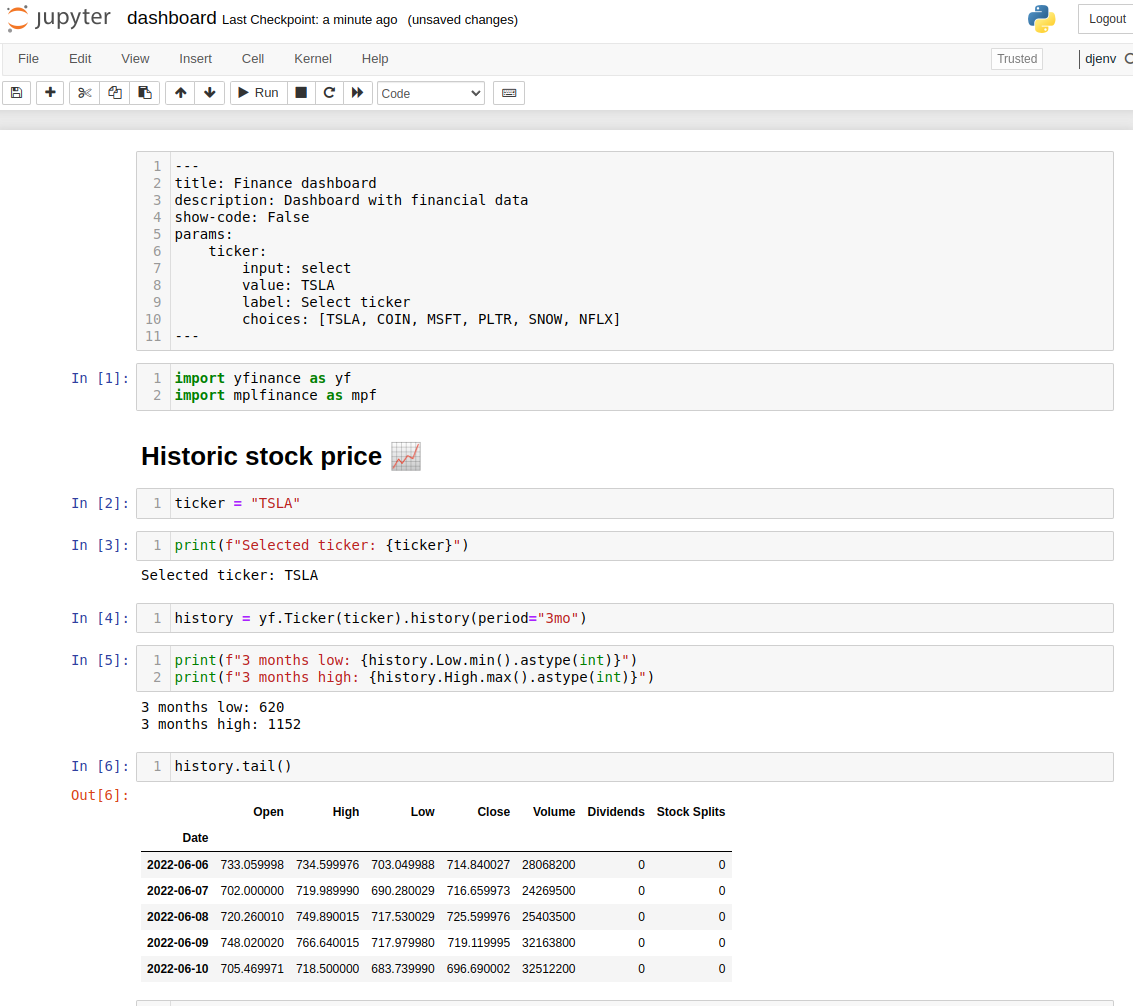
What is more, you don't need to change any code in your notebook. Just add the YAML header in the first raw cell:
---
title: Finance dashboard
description: Dashboard with financial data
show-code: False
params:
    ticker:
        input: select
        value: TSLA
        label: Select ticker
        choices: [TSLA, COIN, MSFT, PLTR, SNOW, NFLX]
---
The YAML will tell the Mercury framework how to display the notebook. It defines the title and app's description. The code is hidden with show-code paramter. The ticker variable is defined as a select widget. The whole notebook is presented below:
OK, but how to run the web app? It is very simple, just run the command:
mercury run
That's all! The Mercury will detect the notebooks in the directory and will serve them as web applications.
Deploy to the cloud
I recommend Heroku service for deployment. It offers free dynos and the deployment can be done with one command! We need to define the Procfile that will tell Heroku how to run our code:
web: mercury run 0.0.0.0:$PORT
Let's commit all files to the repo:
git add dashboard.ipynb
git add requirements.txt
git add Procfile
git commit -am "create dashboard in Python"
git push
We are ready for deployment. The first step is to create the app in the Heroku. I'm using Heroku CLI tool for app creation:
heroku create dashboard-jupyter-notebook
The deployment command:
git push heroku main
Really?! Yes, that's all. Just wait a minute and your server will be running 😊 My dashboard is running at dashboard-jupyter-notebook.herokuapp.com/. The demo of the dashboard is below:
If you update the notebook and would like to deploy a newer version of the notebook, please just use the same command:
git push heroku main
Export notebook to PDF
The Mercury has an option to export executed notebook as PDF file. The typical workflow is:
- user tweaks widgets values,
- user clicks
Runbutton to execute the notebook with new parameters, - user clicks
Downloadbutton to get executed notebook as PDF.
You need to add a Heroku buildpack to make it work. It can be done in the Heroku dashboard:
https://github.com/jontewks/puppeteer-heroku-buildpack
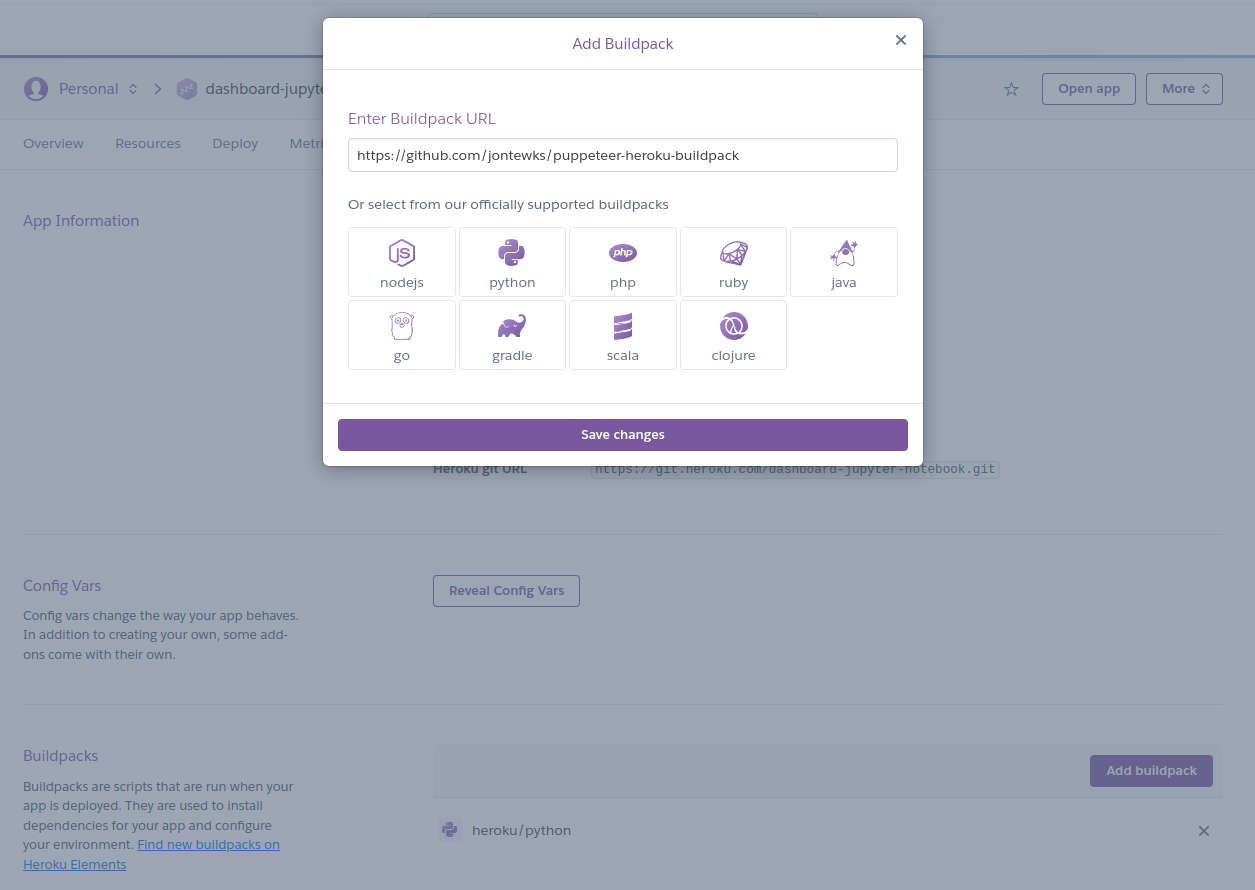
After adding a buildpack with puppeteer you need to re-deploy the app. Please add do changes in the code or add welcome.md file (welcome.md message docs) and deploy with:
git push heroku main
The exporting notebook to PDF with one click:

Summary
The finance dashboard was created with only 9 lines of the Python code. The Jupyter Notebook was used for development. The notebook was published as interactive dashboard thanks to Mercury framework.
- The Python code is available in my repository: github.com/pplonski/dashboard-python-jupyter-notebook.
- The dashboard is available online at dashboard-jupyter-notebook.herokuapp.com/.
If you have any questions or need help please subscribe to the newsletter below. In the form, you can leave feedback, comment, or question. We do our best to respond quickly :)
AI Data Analyst on Your Computer
Use MLJAR Studio to explore data, find insights, and create reports with AI. Everything runs locally, so your data stays with you.
About the Authors


Related Articles
- The 4 ways to export Jupyter Notebook as PDF
- How to hide code in Jupyter Notebook?
- The 4 ways to insert images in Jupyter Notebook
- Build dashboard in Python with automatic updates and email notifications
- The 4 ways to install Jupyter Notebook
- How to send email in Python? (the simplest approach)
- Dashboard for Data Drift Detection in Python
- Automated PDF Reports with Python
- The 3 ways to export Jupyter Notebook to HTML
- The 5 ways to schedule Jupyter Notebook