Automated PDF Reports with Python
Python is a great tool for automation, almost magical. In this article I will show you how to build automated reporting system with Python. The system will create a daily PDF report and send it via email. I will use Python notebook (with Jupyter Notebook) and Mercury framework for PDF generation, scheduling and email sending.
The tasks that our automated reporting system will do:
- fetch stock market data, display news, price chart and analysis,
- execute every day from Monday to Friday at 9:00 AM,
- convert executed notebook to PDF and send in the email attachment.
The notebook automations are created with an open-source Mercury framework. They are achieved with 4 lines of code! The reporting system can be run locally. However, I will deploy it to the cloud (Heroku) in this artcile. The web application is available online at automated-pdf-reports.herokuapp.com. All code is on the GitHub at github.com/pplonski/automated-pdf-reports-python. The demo of the reporting web application is below:

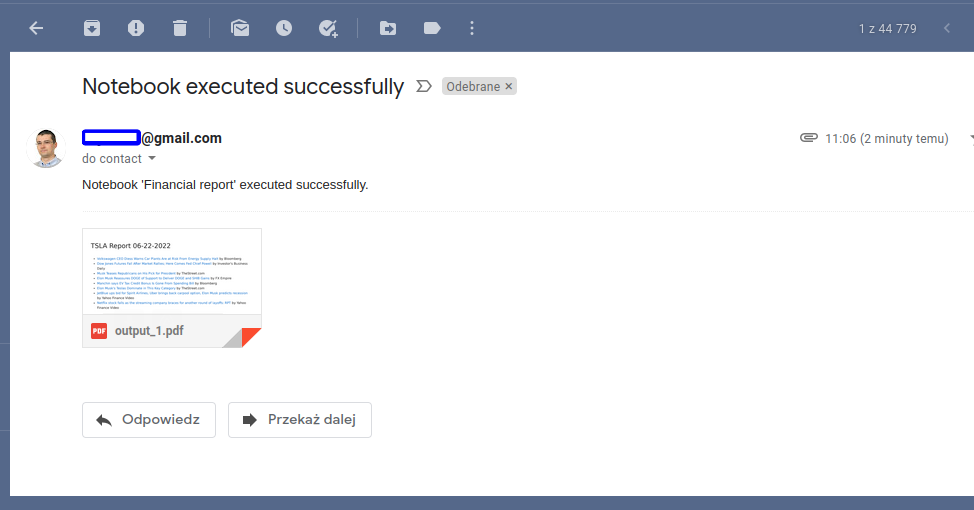
Email with PDF report in the attachment (it was send automatically):
I hope that this article will help you to build your own automated reporting system in Python. In case any questions please contact me with the following form. 😊
Setup local environment
Let's start with creating a GitHub project (please create a new repository on the GitHub website). All my code is on github.com/pplonski/automated-pdf-reports-python. The first step is to clone the project:
git clone git@github.com:pplonski/automated-pdf-reports-python.git
The next step is to create a requirements.txt file with Python packages that we will use:
mljar-mercury
yfinance
mplfinance
We will need the requirements.txt when deploying the notebook to the cloud. (Don't worry, it will be easy). The next step is to create a virtual environment:
# create virtual environment
virtualenv reportenv

# activate the env
source reportenv/bin/activate

# install packages
pip install -r requirements.txt
The reportenv is the name of the virtual environment. The last step is to set our new virtual environment as Jupyter kernel, so we can use it in the Jupyter Notebook when creating a new notebook.
python -m ipykernel install --user --name reportenv
Python notebook
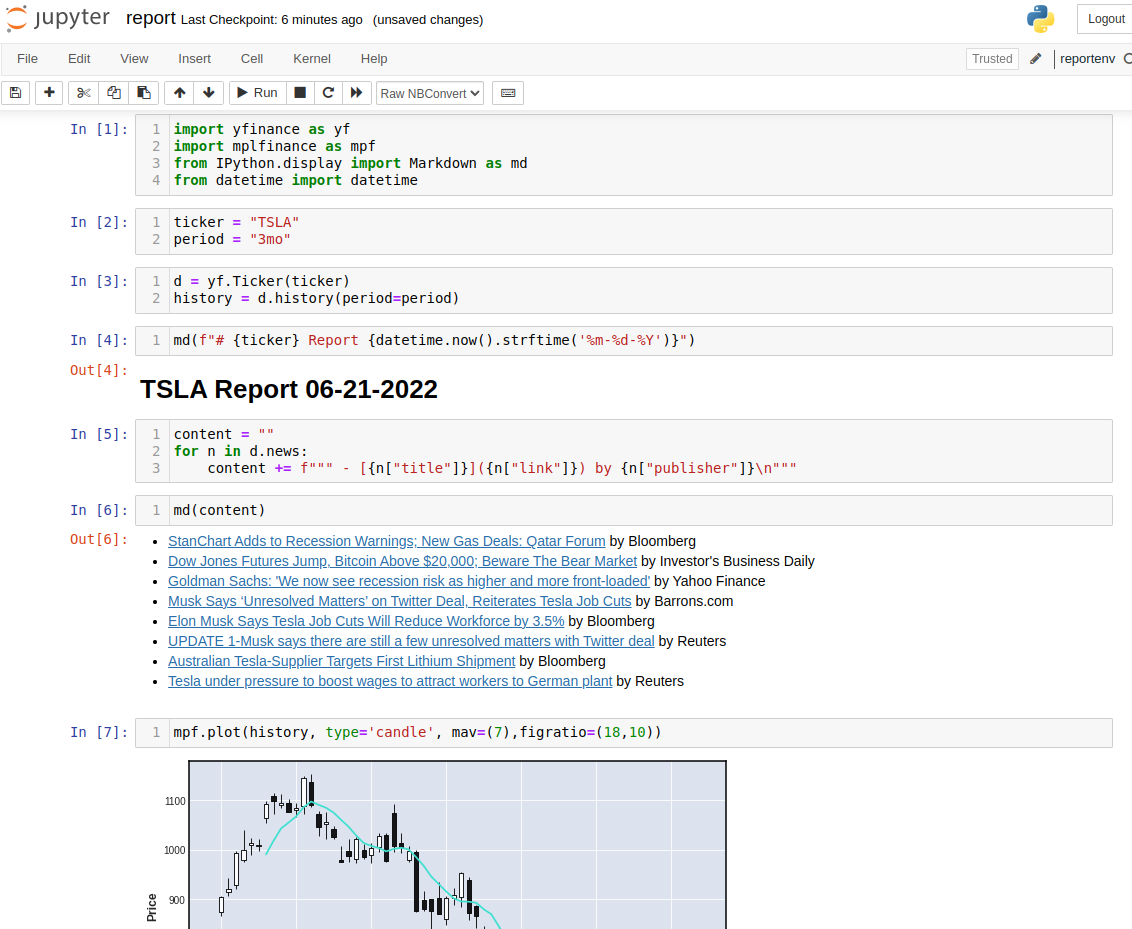
The environment is ready. We can start work on Python notebook. The notebook will fetch the latest stock data with yfinance package. It is using Yahoo Finance API. Next, the notebook will display list of recent news, plot a finance chart with mplfinance and display analysis.
Let's start a Jupyter Notebook and create a new notebook report.ipynb. Please remember to select the reportenv kernel.
# start jupyter notebook
jupyter notebook
As usual, the first step is to import all required packages (I wish I could automatize this one day):
import yfinance as yf
import mplfinance as mpf
from IPython.display import Markdown as md
from datetime import datetime
The data presented in the notebook will be controlled with two variables:
ticker = "TSLA"
period = "3mo"
We will use ticker variable to select the stock. The period is a variable that controls the history length. It will be directly used in the yfinance package.
Let's start with a good header. It will show ticker and a current day. Displaying header will be a little tricky. I will contrcut a string with header and use IPython.display.Markdown to display it as a Markdown.
md(f"# {ticker} Report {datetime.now().strftime('%m-%d-%Y')}")
Please notice that the cell is still a code type and I'm using # for making a header - Markdown syntax inside a string.

Fetching the stock data is done in two lines of Python code:
d = yf.Ticker(ticker)
history = d.history(period=period)
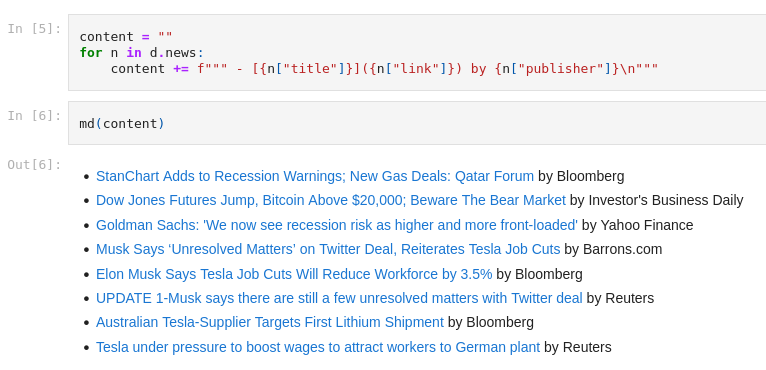
Isn't it amazing? Recent news are in JSON format and are availble as news member variable. Let's construct the string with list of news:
content = ""
for n in d.news:
    content += f""" - [{n["title"]}]({n["link"]}) by {n["publisher"]}\n"""
Displaying string as Markdown in the Jupyter Notebook:
md(content)
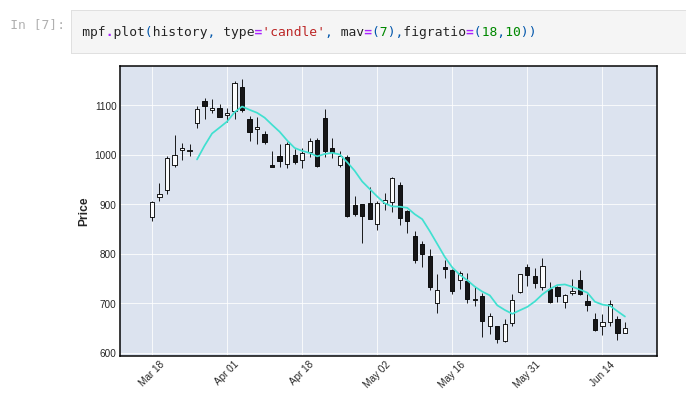
Let's plot some data. Creating a financial chart with mplfinance is super easy:
mpf.plot(history, type='candle', mav=(7),figratio=(18,10))
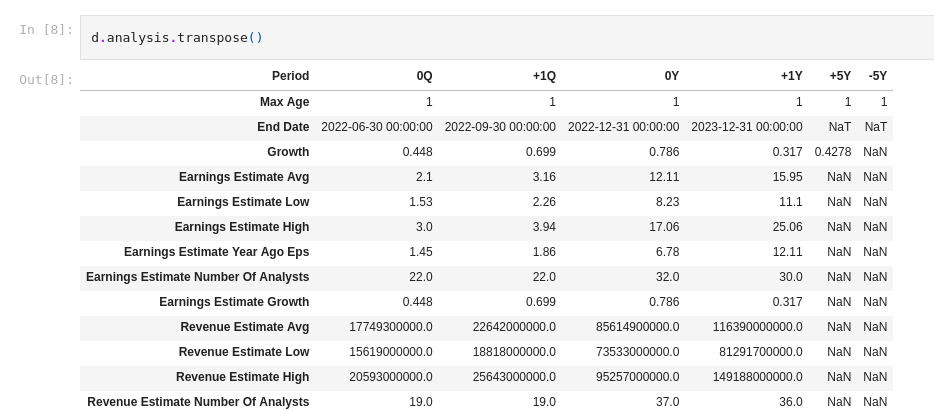
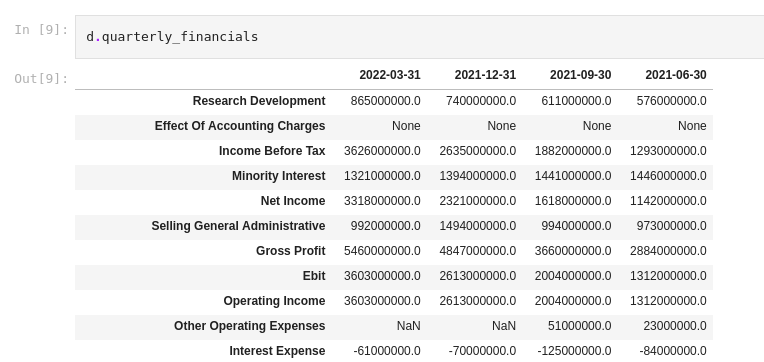
The yfinance provides analysis and financial details for stocks. They can be easily accessed as Pandas DataFrames.
d.analysis.transpose()
d.quarterly_financials
OK, the notebook with financial report is ready. It should look like in the image below:
All code is created, bad news is that we can't share the report in the current shape. The code should be hidden and the notebook should be converted to PDF (Portable Document Format) so it can be open on any operating system. Good news is that it can be easily done with Mercury framework.
Share notebook with Mercury
Let's use the Mercury framework to make our notebook shareable:
- make it interactive with
tickerandperiodas select widgets, - hide code to not scare non-technical shareholders,
- easily convert to PDF format,
- schedule a daily execution with email notifiction and PDF report in the attachment.
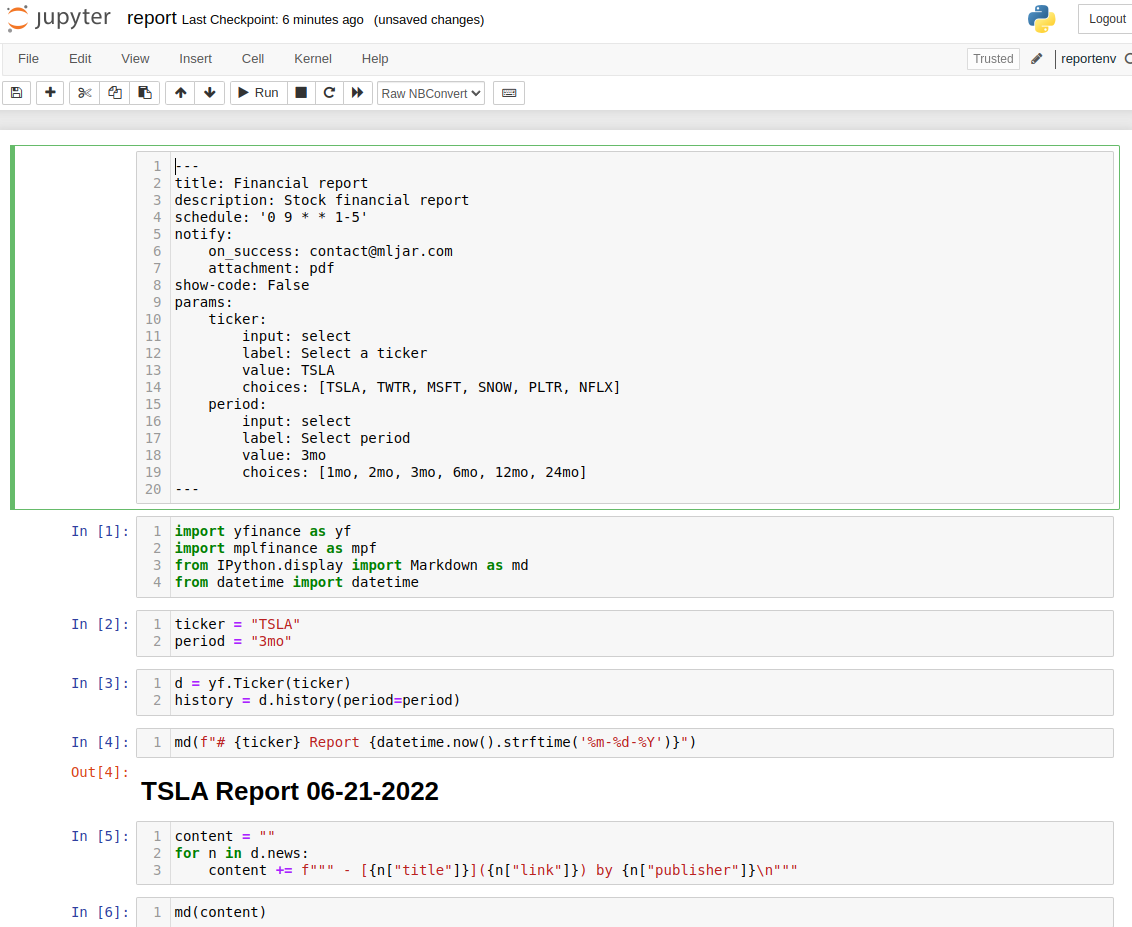
The above features can be achieved by adding a RAW cell at the beginning of the notebook with the YAML configuration:
---
title: Financial report
description: Stock financial report
schedule: '0 9 * * 1-5'
notify:
    on_success: contact@mljar.com
    attachment: pdf
show-code: False
params:
    ticker:
        input: select
        label: Select a ticker
        value: TSLA
        choices: [TSLA, TWTR, MSFT, SNOW, PLTR, NFLX]
    period:
        input: select
        label: Select period
        value: 3mo
        choices: [1mo, 2mo, 3mo, 6mo, 12mo, 24mo]
---
The YAML contains:
titleanddescriptionof the report,scheduleparameter controls the time interval at which the notebook will be executed, it is set with crontab string,notifyparameter defines the list of email addresses that will receive notification after successful notebook execution, theattachmentdefines the format of the report,show-codehides the code in the notebook,paramsaddes two select widgets that are directly connected to variablestickerandperiod. You can check more widget types in the Mercury's documentation.
The notebook with YAML header should look like in the image below:
To check how it is working locally you can run:
mercury run
It will start a local server. Please open the web browser with address 127.0.0.1:8000, you should see the Mercury web service running. You can tweak widgets values and execute the notebook with new parameters with Run button:

Deployment
We will deploy the Mercury in the cloud server to run it automatically on daily basis. I will use Heroku for demo purposes. You can check guides for deployment in other clouds in the documentation. I'm using Heroku CLI tool.
Let's create a new Heroku app:
heroku create automated-pdf-reports
The next step is to add Procfile that configures how Heroku execute our code:
web: mercury run 0.0.0.0:$PORT
We need to push all files to the GitHub repository:
git add report.ipynb
git add requirements.txt
git add Procfile
git commit -am "add notebook"
git push
Deployment to the cloud is done with one command:
git push heroku main
Please wait a while and you should see Mercury web application running. My app is running at automated-pdf-reports.herokuapp.com.
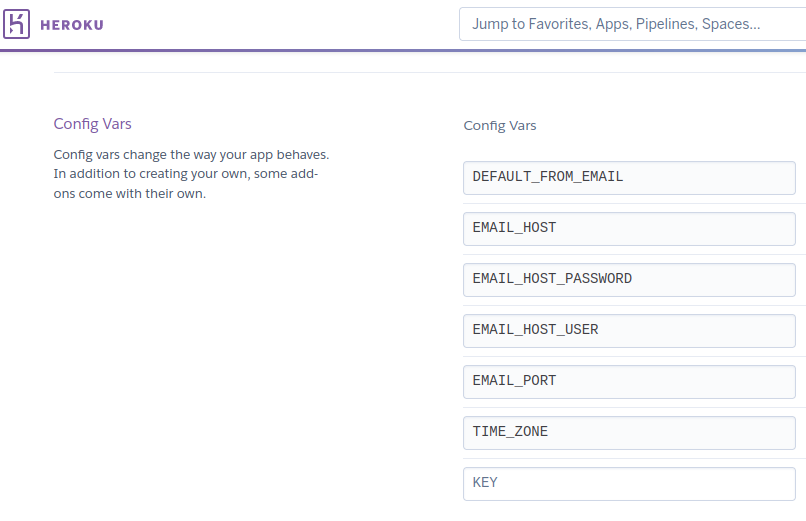
We need do configure email settings to enable notifications sending. Additionally, we will set a TIME_ZONE to set email notification in my timezone. We need to define following environment variables:
EMAIL_HOST
EMAIL_HOST_PASSWORD
EMAIL_HOST_USER
EMAIL_PORT
DEFAULT_FROM_EMAIL
TIME_ZONE
The example values can be:
EMAIL_HOST=smtp.gmail.com
EMAIL_HOST_PASSWORD=app-password
EMAIL_HOST_USER=your-email@gmail.com
EMAIL_PORT=587
DEFAULT_FROM_EMAIL=your-email@gmail.com
TIME_ZONE=Europe/Warsaw
I'm setting the environment variables in the Settings tab in the Heroku dashboard, below is the screenshot:
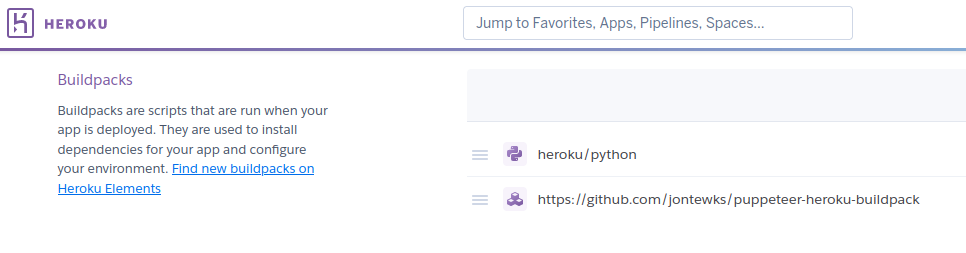
Exporting notebook to PDF requires a Puppeteer buildpack:
https://github.com/jontewks/puppeteer-heroku-buildpack
Please add it in the Heroku dashboard (it should be available below config vars):
OK, we will need to deploy the app again to see the changes. This can be done by updating a notebook. In my case I will add a welcome.md message to the Mercury web application. It will be a custom message availabe in the home view. You can read more about welcome message in the documentation.
Deployment of updated app can be done with:
git push heroku main
That's all! 😊 Now let's wait for automatic PDF reports. They will be delivered to the email address in the attachement.
Summary
The Jupyter Notebook gives a WYSIWYG editor for report building. The Mercury framework makes additional work of making interactive widgets, code hidding, scheduling, exporting to PDF, sending email notifications. Both tools makes a perfect combination for creating automatic reporting systems.
- Python code used in the article is available at github.com/pplonski/automated-pdf-reports-python
- Web application for with scheduled notebook and email notifications with PDF notebooks is available online on automated-pdf-reports.herokuapp.com
If you have any questions or need help please subscribe to the newsletter below. In the form, you can leave feedback, comment, or question. We do our best to respond quickly :)
AI Data Analyst on Your Computer
Use MLJAR Studio to explore data, find insights, and create reports with AI. Everything runs locally, so your data stays with you.
About the Author

Related Articles
- Build dashboard in Python with automatic updates and email notifications
- The 4 ways to install Jupyter Notebook
- How to create a dashboard in Python with Jupyter Notebook?
- How to send email in Python? (the simplest approach)
- Dashboard for Data Drift Detection in Python
- The 3 ways to export Jupyter Notebook to HTML
- The 5 ways to schedule Jupyter Notebook
- Schedule Jupyter Notebook to run daily
- Create Presentation from Jupyter Notebook
- Create Parameterized Presentation in Jupyter Notebook