How to share Jupyter Notebook with non-programmers?
Your analysis is ready. You found very important insights. Congratulations! What's next? You need to share your Jupyter Notebook with non-programmers. How to do this? You can't send them the ipynb file in the email attachement or just push it to the GitHub repository. Your peers don't understand Python and can't reproduce your work on their own computers. You can create a presentation for them. This can be tedious manual work that might require many updates if data and final results will changes. What to do? Don't worry! In this post, I will show you how to share Jupyter Notebook with non-programmers.
I will go step-by-step process of how to make a Python notebook accessable for non-technical users. First, I will create an example notebook. Then, I will add YAML header to make a web app from notebook with Mercury framework. The last step will be deployment of the interactive notebook to the cloud (with Heroku).
Example notebook
Let's start a new GitHub repository (it is rather a good idea to keep code in repo). My repository is available at github.com/pplonski/share-jupyter-notebook. I've created in on the GitHub website. The next step is to clone it locally.
git clone git@github.com:pplonski/share-jupyter-notebook.git
My usual approach is to set-up a virtual environment for each new project:
# create virtual env
virtualenv share-env --python=python3.8
# activate the env
source share-env/bin/activate
I keep all needed packages in the requirements.txt file:
# requirements.txt file
mljar-mercury
matplotlib
Please run following command to install them:
pip install -r requirements.txt
Last step to prepare the development environment is to add a Jupyter kernel pointing to newly created virutal env:
python -m ipykernel install --user --name=share-env
OK, we are ready to start a Jupyter Notebook (it's client is installed with mljar-mercury package):
jupyter notebook
Important: when starting a new notebook please make sure that you select a kernel with the virtual environment name. In my case it is share-env.
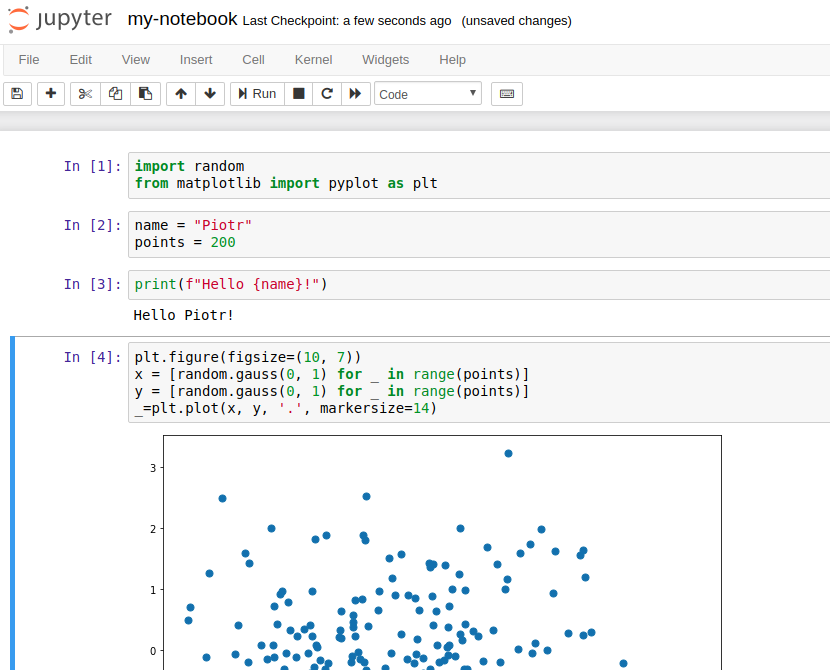
Let's start coding! It will be a very simple notebook that will print name and plot a chart with some random points. The displayed name and points count will be controlled with name and points variables. The notebook's code is in the picture below. You can check the notebook's code is in the repository.
Convert to Web Application
The next step is to add a RAW cell at the top of the notebook. It will be a place for YAML header required by Mercury. The YAML will have information about web app:
title- it will be displayed in the main site and sidebar,description- it will be displayed in the main site,show-code- you can decide to show or hide the code
What is more, the YAML will have the information about needed widgets. The widgets will have the same name as variables in the code. The full YAML header:
---
title: My notebook
description: Notebook with plot
show-code: False
params:
    name:
        input: text
        label: What is your name?
        value: Piotr
    points:
        input: slider
        label: How many points?
        value: 200
        min: 10
        max: 250
---
That's all. There is a screenshot of my notebook with YAML header:

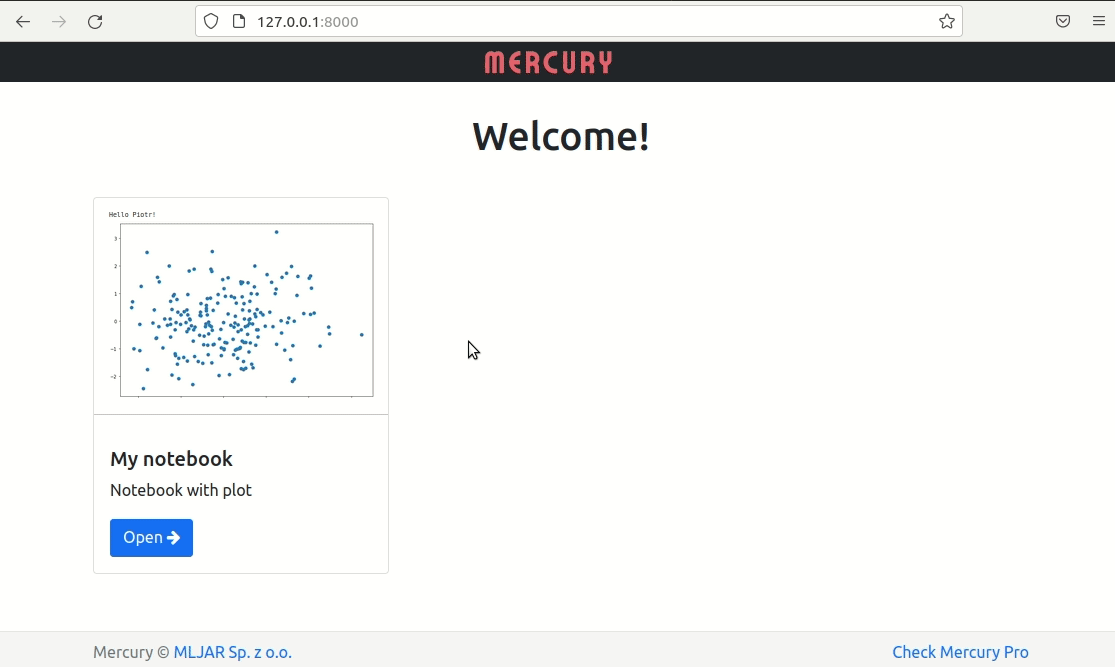
Please start Mercury server locally to check the web application:
mercury run
Please open your favourite web browser and enter 127.0.0.1:8000 address. You should see the website with your notebook! Please open the app by clicking Open button. You should see two widgets:
- text input for
namevariable, - slider for
pointsvariabale.
You can change the widgets values and click Run button to execute the whole notebook with new values. The below animation presents app in action:
To the cloud! (deployment)
We need to deploy the app to make it available to others. I will use for this Heroku service. It offers free dynos (servers) that are sufficient for simple apps. I'm using Heroku CLI tool. Please first create the app:
heroku create share-jupyter-notebook
It will create a dyno with address share-jupyter-notebook.herokuapp.com. We will need to add a Procfile to the project. It will tell the Heroku how to run our application.
web: mercury run 0.0.0.0:$PORT
Please make sure that all files are added and pushed to the GitHub:
git add requirements.txt
git add my-notebook.ipynb
git add Procfile
git commit -am "notebook as web app"
git push
We are ready to deploy the app to the Heroku:
git push heroku main
Yes, that's all :) 🎉
You can check the app running at share-jupyter-notebook.herokuapp.com.
Summary
Jupyter Notebook can be easily published as web application thanks to Mercury framework. There is no need to change any code in the notebook itself, just add the YAML header. It contains information how the app should be displayed in the Mercury. You can easily hide the code with show-code parameter. The widgets are defined in the YAML too. They have the same name as variables in the code, which makes the conversion process very strightforward.
In this article the notebook was deployed to the Heroku. It can be deployed on any machine that is running Python. Please read the documentation about other deployemnt options.
The Mercury provides many features that are not discussed in this article:
- user can download executed notebook as standalone HTML or PDF file,
- authentication can be added to the notebook with one line of YAML (please see the documentation)
- notebooks deployed with
Mercurycan be easily embedded on any website.
I hope that Mercury will help you to share Jupyter Notebooks with non-programmers in an effective way. Good luck!
AI Data Analyst on Your Computer
Use MLJAR Studio to explore data, find insights, and create reports with AI. Everything runs locally, so your data stays with you.
About the Authors


Related Articles
- How to create Mercury private fork and customize?
- PDF cheatsheets for 32 Jupyter Notebook Shortcuts
- The 8 surprising ways how to use Jupyter Notebook
- The 7 ways to run Jupyter Notebook online
- The 5 ways how to style text in Jupyter Notebook
- The 4 ways to export Jupyter Notebook as PDF
- How to hide code in Jupyter Notebook?
- The 4 ways to insert images in Jupyter Notebook
- Build dashboard in Python with automatic updates and email notifications
- The 4 ways to install Jupyter Notebook