The 3 ways to hide code in Jupyter Notebook Presentation
Creating a Jupyter Notebook presentation is a great way to share your data-rich results. All your plots and results are already in slides. There is no need to copy results between Jupyter Notebook and software for presentation manually. The slideshow is a preferred way to share results with non-technical stakeholders. The code in the slides might scare them. How to hide code in a presentation generated from Jupyter Notebook? We will show you 3 approaches to hiding code in the slides.
Use nbconvert
The nbconvert command line tool can be used to convert Jupyter Notebook to presentation slides. It has an option --no-input to hide the input code. The command to convert Jupyter Notebook to the presentation:
jupyter nbconvert --to slides --no-input my-notebook.ipynb
The above command will produce a my-notebook.slides.html file with a Reveal.js presentation.
If you would like to serve the presentation locally without the code, use:
jupyter nbconvert --to slides --no-input --post serve my-notebook.ipynb
Hide-code extension
There is a hide_code extension. It can be used to hide code in cells selectively. The nice thing about the extension is that it works with the nbconvert and a RISE extension for slide development.
Installation steps in the virtual environment (added --user parameter):
pip install hide_code
jupyter nbextension install --py --user hide_code
jupyter nbextension enable --py --user hide_code
jupyter serverextension enable --py --user hide_code
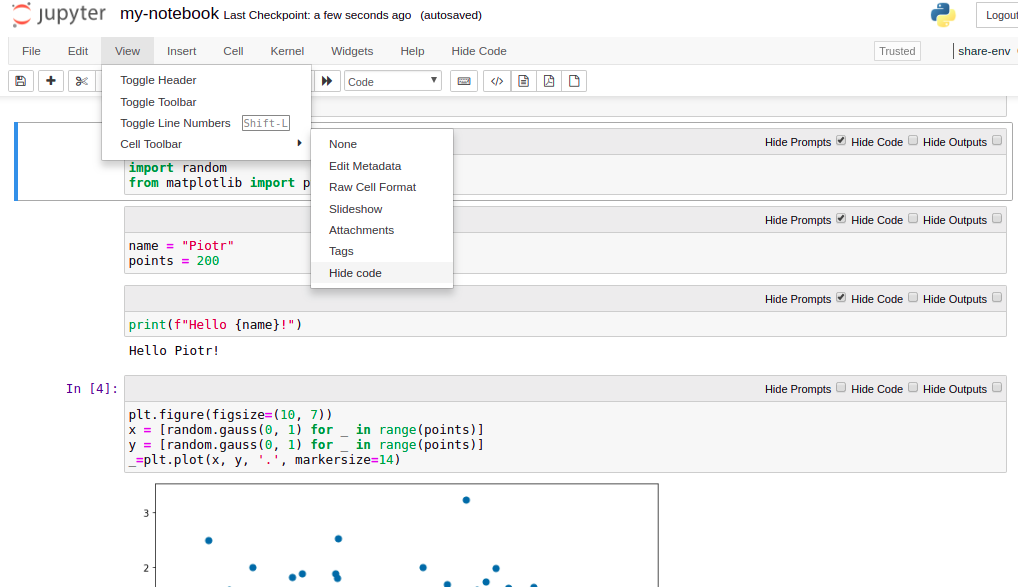
Please switch on the Hide code extension in the cell by clicking View->Cell Toolbar->Hide Code. Each cell will have a toolbar where you can click a checkbox to show or not a cell in the output notebook.
The hide_code extension can be used with a nbconvert tool with a hide_code_slides argument passed:
jupyter nbconvert --to hide_code_slides my-notebook.ipynb
Hide code in Mercury
The Mercury open-source framework can be used to create parameterized presentations. It uses the YAML header to add interactive widgets to the notebook. There is a show-code parameter, which decides about displaying the code.
The example YAML header:
---
title: Parametrized Presentation 📊
description: Presentation with widgets
output: slides
show-code: False

# the rest of parameters ...
---
The YAML header is added in the first cell of the notebook. The Mercury serves the notebook as a web application. The output can be a web application, dashboard, report, or presentation.
An example of the parameterized presentation created with Jupyter Notebook and Mercury:

Summary
Not everyone is a code lover. Developers using Jupyter Notebook to create slides need to hide the code in the presentation. Slides with hidden code don't scare non-technical users and still have all plots and results. The Jupyter Notebook with code and results can be committed to a code repository, where tech-savvy users can view them.
AI Data Analyst on Your Computer
Use MLJAR Studio to explore data, find insights, and create reports with AI. Everything runs locally, so your data stays with you.
About the Authors


Related Articles
- The 3 ways to export Jupyter Notebook to HTML
- The 5 ways to schedule Jupyter Notebook
- Schedule Jupyter Notebook to run daily
- Create Presentation from Jupyter Notebook
- Create Parameterized Presentation in Jupyter Notebook
- Convert Jupyter Notebook to spaCy NLP web application
- The 4 ways to run Jupyter Notebook in command line
- The 2 ways to convert Jupyter Notebook Presentation to PDF slides
- The 3 ways to share password protected Jupyter Notebook
- The 3 ways to change figure size in Matplotlib